Crafts by Courtney

How-to Crafts and DIY Parties

  • Home
  • How-to Crafts
    • Home Crafts
      • Holiday
      • Seasonal
      • DIY Decor
    • Kids Crafts
      • Holiday
      • Seasonal
      • Educational
      • Clean
      • Messy
  • DIY Parties
    • Birthdays
    • Just for Fun
    • Holidays
  • Blog
    • My Thoughts
    • Hubby’s Corner
  • About
  • Contact

How-to Craft a Toilet Paper Roll Snowman

Toilet paper roll snowmen craft

Craft Materials

Before starting this project, you’ll need the following materials:

Toilet Paper Rolls, Cardstock, Paint, Pipe Cleaners, Pom Poms, Ribbon, Buttons, Glue Gun

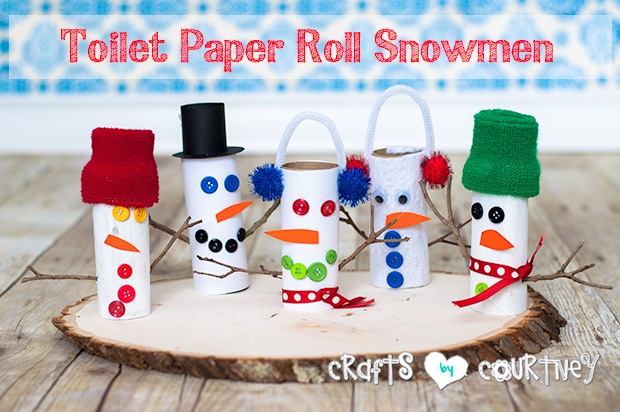
I’m so excited to get started on Christmas crafts with my boys this year. I just love a Christmas craft, who doesn’t right?? I’ve posted several already and really wanted to add a SNOWMAN this year.

I haven’t done a toilet paper roll craft since my toilet paper roll rabbits, and really wanted to give it a try again!

Side Note: If you like snowmen, then you’ll love this cute popsicle stick snowflake ornament craft the boys made.

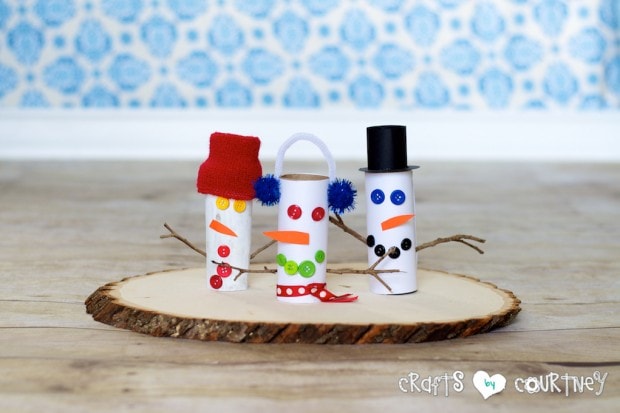
There are so many ways to create your toilet paper roll snowman. I couldn’t choose just one way, so I did THREE!! For this tutorial, I’m just showing step-by-step pictures for the cardstock and painted snowmen.

Getting Started

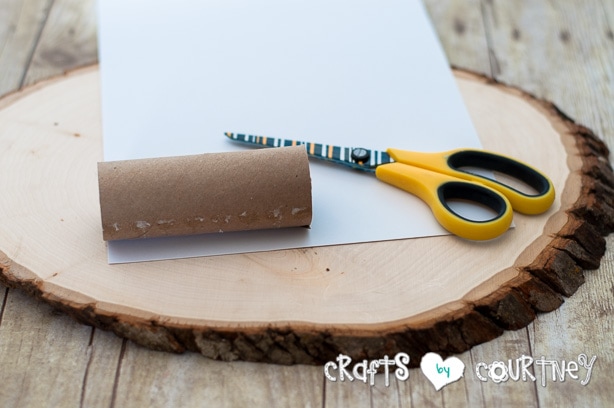
To get started, you’re going to need toilet paper rolls!! Just decide how your going to cover your rolls. I have paper and paint in the getting started picture, but we also used felt. I grabbed some buttons and orange cardstock for their faces.

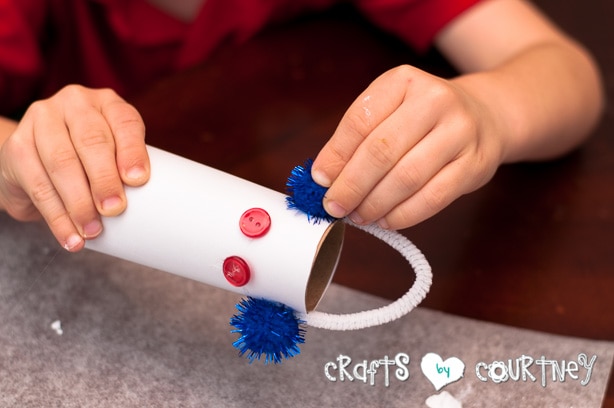
For the HAT, I used an arm band. I’ve seen people use socks, but I thought the arm band was super cute.

For the ear muffs, we used some pom pom balls and a pipe cleaner. Once we had our materials we were ready to get crafting!!

Christmas Craft: Toilet Paper Roll Snowmen: Getting Started

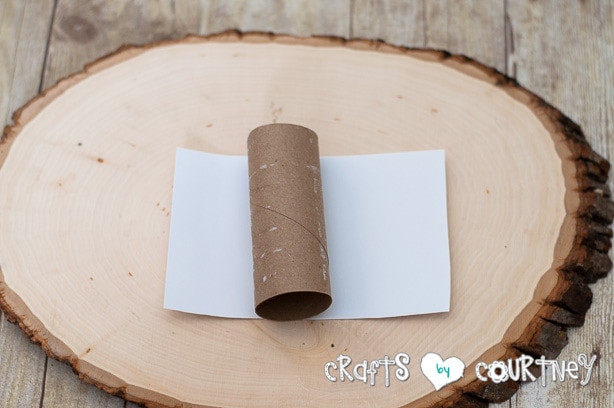
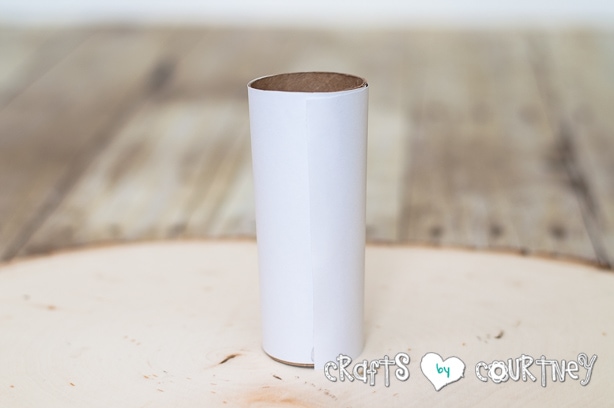
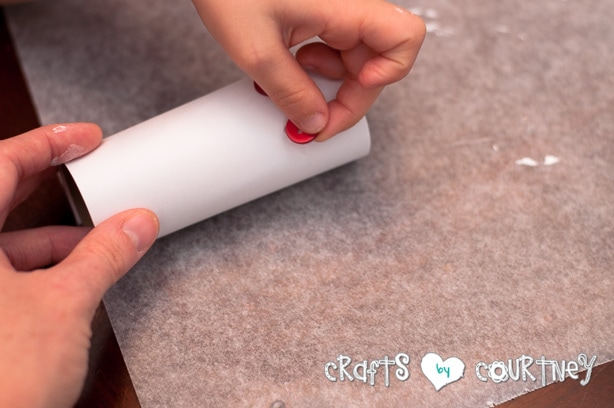
Step 1 – Cover Your Toilet Paper Roll

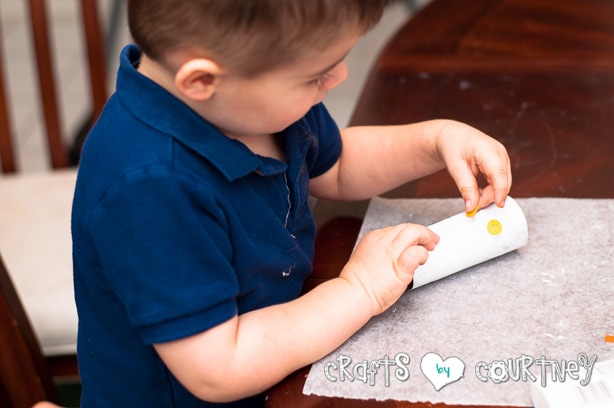
I used white cardstock and traced out my toilet paper roll. I wanted make sure the toilet paper roll was completely covered with paper.

I had my two year old paint his toilet paper roll since that would be easiest for him to do.

Christmas Craft: Toilet Paper Roll and Snowmen:
Christmas Craft: Toilet Paper Roll Snowmen: Cut Paper
Christmas Craft: Toilet Paper Roll Snowmen: Cover Your Toilet Paper Roll
Christmas Craft: Toilet Paper Roll Snowmen: Paint Your Toilet Paper Roll
I had to bribe him with a cookie so he had chocolate all over his face. ;-)

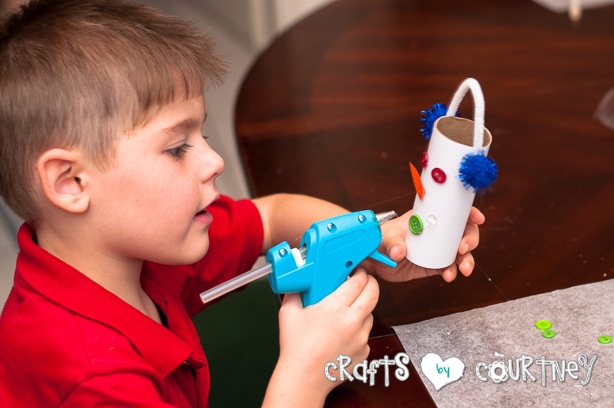
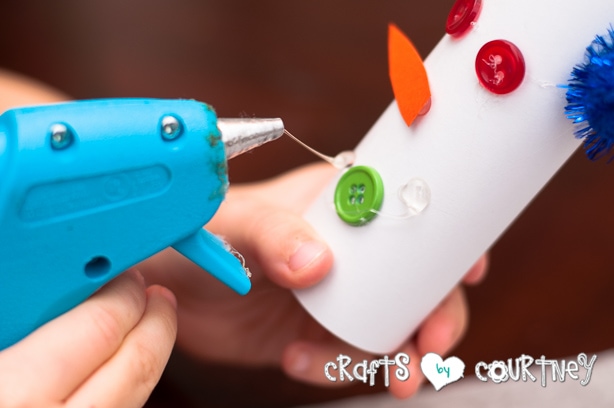
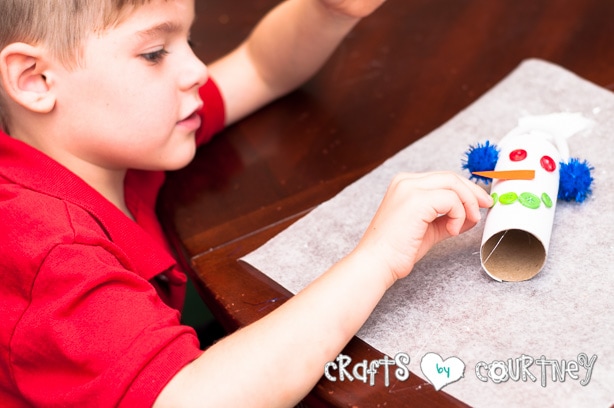
Step 2 – Add Your Snowman’s Face

Since my oldest is becoming a BIG BOY crafter, I let him use my “Trusty” hot glue gun (supervised of course) and he did a great job!! He was very excited to use it.

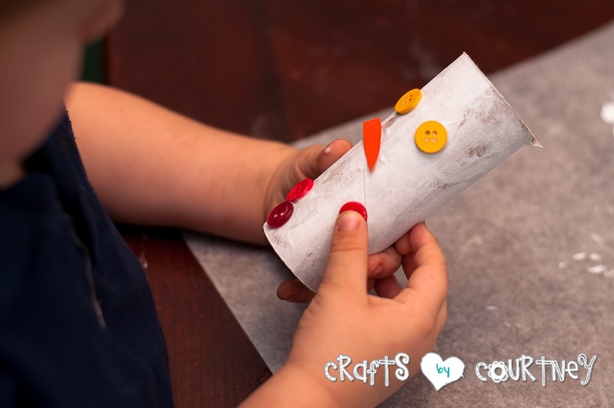
He hot glued on the eyes, nose and mouth. I cutout orange cardstock for the “carrot” nose.

I added glue to spots where I wanted my 2 year old to add his buttons and nose. That worked out perfect for him. I know if I let him use the glue himself it would be all over the place.

Christmas Craft: Toilet Paper Roll Snowmen: Add Your Button Eyes
Christmas Craft: Toilet Paper Roll Snowmen: Add Your Button Mouth
Christmas Craft: Toilet Paper Roll Snowmen: Hot Glue Your Buttons On
Christmas Craft: Toilet Paper Roll Snowmen: Hot Glue Your Mouth On
Christmas Craft: Toilet Paper Roll Snowmen: For Younger Kids Your Can Use Regular Glue For the Face
Christmas Craft: Toilet Paper Roll Snowmen: Glue on Your Eyes, Nose and Mouth

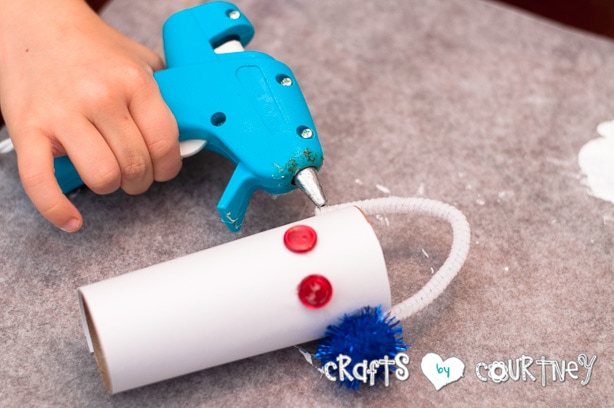
Step 3 – Add Your Ear Muffs/Hat

I did a couple different styles for the hats. My 5 year old wanted ear muffs. We cut a pipe cleaner to the length we needed and hot glued it into place. Then, we picked out some SPARKLY pom pom balls and hot glued those to the bottom of the pipe cleaner.

I used the arm band for my two year old’s snowman, since that would be the easiest for him. Well, I thought so…he wanted to take the arm band and run around with it!

Christmas Craft: Toilet Paper Roll Snowmen: Hot Glue Your Pipe Cleaner for Ear Muffs
Christmas Craft: Toilet Paper Roll Snowmen: Add Your Pom Pom Ball for the Ear Muffs

Step 4 – Finishing Touches

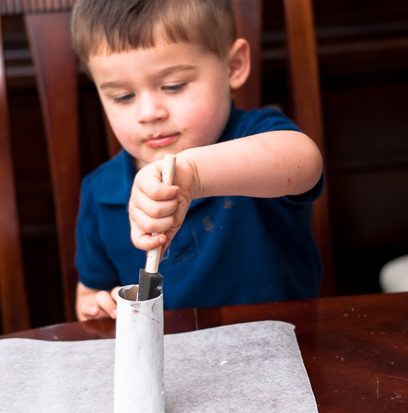
Once we were DONE with our snowmen, my little guy thought we needed some arms. We went out into the backyard, and grabbed a ton of little sticks.

Then, I used my “Handy Dandy” X-Acto knife and cut small slits on the sides of the snowmen and gently pushed in the sticks.

Christmas Craft: Toilet Paper Roll Snowmen: These are the Snowmen my Boys Made
My boys did such a great job with their snowmen!!
Christmas Craft: Toilet Paper Roll Snowmen: My Boys were so proud of their snowmen!
Christmas Craft: Toilet Paper Roll Snowmen: Showing off the Snowmen him and his brother worked on.
Christmas Craft: Toilet Paper Roll Snowmen: We used Cardstock, Felt and Paint to create our snowmen
These are the three I worked on. The first one is cardstock, second was felt and the last was painted.
Toilet Paper Roll Snowman Craft! Great Winter activity with kids

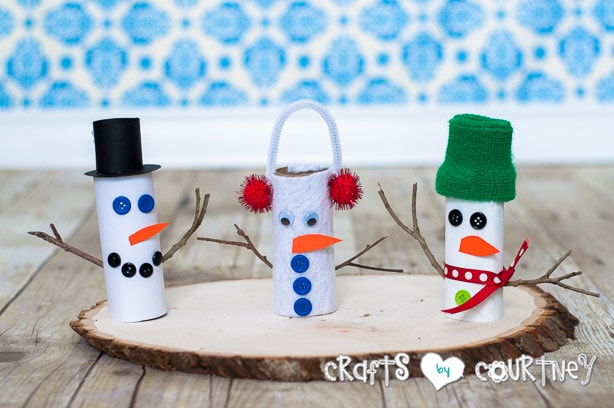
Quick Tip: Keep the slits small, and you WON’T need glue to keep the arms in place!

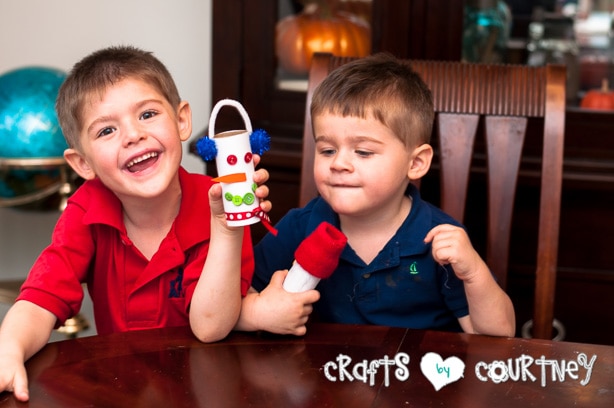
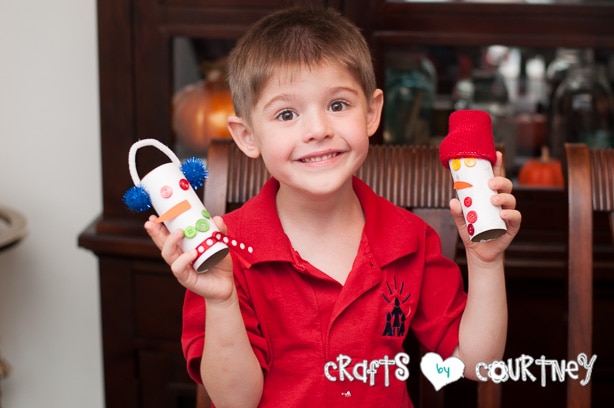
As you can see (from my little bears’ faces), they had a lot of fun making their snowmen. We made SO MANY, now we have a complete family (except a mom) Guess I need to make another one now…

This really is a simple and easy craft to do, and I loved seeing what my little guys came up with.

I hope you enjoyed this craft as much as we did making it!! Enjoy your holiday!!

Courtney's signature

About Courtney Sanchez

Hi, I'm Courtney and I LOVE crafting! I am a mommy to 3 awesome boys (who keep me very busy) and wife to a loving husband. Crafts by Courtney is where I like to hang out ;)

Leave a Reply

Hi, I'm Courtney!

Welcome. Here is where I share the fun how-to crafts I've done with my kids and for my home. I also really love DIY parties too! Read More…

My Socials

  • Facebook
  • Instagram
  • Pinterest

Newsletter

Subscribe to my email newsletter for more craft ideas, tips and valuable resources.

The TOP 4

  • 33 Awesome Birthday Party Ideas for Boys33 Awesome Birthday Party Ideas for Boys
  • Terra Cotta Pot DIY Lighthouse Garden ProjectTerra Cotta Pot DIY Lighthouse Garden Project
  • Cardboard Box Craft - DIY DollhouseCardboard Box Craft – DIY Dollhouse
  • Beaded DIY Wind Chimes For KidsBeaded DIY Wind Chimes For Kids

Looking for more?

Over on Instagram

craftsbycourt

Happy Thursday friends! One of my favorite decor a Happy Thursday friends! One of my favorite decor accessories is... you guessed it, FOWERS! I have flowers all over my house, several in each room actually. I even switch them out for the seasons. One of my favorite places to find faux flower arrangements is @homegoods. They have the bet selection to choose from. 🌺🌻
.
.
.
.
#bedroommakeover #bedroominspo #blueandwhitedecor #coastalfarmhouse #coastalfarmhousestyle #farmhouseliving #farmhouse #whitebedroom #bedroominspiration #mybedroomstyle #bedroomstyling #ashleyfurniture #worldmarketfinds #coastalvibes #mystylishspace #bedroomlove #stylishhome #blueandwhiteforever #coastalinteriors #flowersofinstagram #flowerinspiration #flowerdecor #flowerstyling #
One of my favorite pieces in my master bedroom is One of my favorite pieces in my master bedroom is this light fixture I got at @worldmarket. I have been eyeing it for years, and knew when I finally decided to give my bedroom a makeover I had to have it! What a difference a light fixture can make in a room. I love just laying in bed and staring at it, kinda obsessed.
.
.
.
#lightfixture #lightfixturelove #lightfixturesofinstagram #lightfixtureobsession
#bedroommakeover #bedroominspo #blueandwhitedecor #coastalfarmhouse #coastalfarmhousestyle #farmhouseliving #farmhouse #whitebedroom #bedroominspiration #mybedroomstyle #bedroomstyling #ashleyfurniture #worldmarketfinds #coastalvibes #mystylishspace #bedroomlove #stylishhome #blueandwhiteforever #coastalinteriors
.
.
After being in our house for 7 years we finally de After being in our house for 7 years we finally decided in August to start our bedroom makeover. We've put this room off last and focused more on the other rooms in the house since we moved in. For our 20 year wedding anniversary, we decided it was time to give OUR bedroom a makeover now. I feel like it's been a long process, but I'm so happy with what's been done so far. It's so bright and airy in here now, a perfect way to relax and unwind for the day. We still need to shiplap the walls, but I wanted to share a sneak peek.
.
.
.
.
#bedroommakeover #bedroominspo #blueandwhitedecor #coastalfarmhouse #coastalfarmhousestyle #farmhouseliving #farmhouse #whitebedroom #bedroominspiration #mybedroomstyle #bedroomstyling #ashleyfurniture #worldmarketfinds #coastalvibes #mystylishspace #bedroomlove #stylishhome #blueandwhiteforever #coastalinteriors
Miss Scarlett sweet face! 😍🐾 . . . . #master Miss Scarlett sweet face! 😍🐾
.
.
.
.
#masterbedroom #masterbedroomdecor @our_coastal_farmhouse #coastalliving #coastaldecor #coastaldecor #coastalfarmhouse #goldenretriever #goldensofinstagram #goldensofinsta #dogsofinstagram #goldensretrieverofinstagram
BIG smile from Scout this morning! Happy Monday fr BIG smile from Scout this morning! Happy Monday friends! I've been working on a master bedroom refresh since August and I'm getting so close to finishing and sharing with everyone! I just need to shiplap those walls, but finding decor is so much easier and fun!
.
.
.
.
#masterbedroom #masterbedroomdecor @our_coastal_farmhouse #coastalliving #coastaldecor #coastaldecor #coastalfarmhouse #goldenretriever #goldensofinstagram #goldensofinsta #dogsofinstagram #goldensretrieverofinstagram
It’s Sunday! I’m so excited for this beautiful It’s Sunday! I’m so excited for this beautiful day. I'm sharing a project I did a couple years ago, a Terra Cotta Pot Lighthouse for my front flower bed🌸🌼. I used @decoart Outdoor Living Paints and It's been 4 years and this Lighthouse has held up great! 🎨Full Tutorial Link Below 👇👇
.
.
.
.
.
#decoart #decoartprojects #outdoorlivingpaint #garden #lighthouse #makersgonnamake #crafty #diy #diygarden #handmade #maker #garden_styles #outside_project #yardprojects #summerproject #outdoordecor
Follow on Instagram

Who I Work With

Crafts by Courtney   ·   Copyright © 2013 - 2022