OKAY, so you want to add a multi resolution favicon to your site.
That’s good, real good! But what IS a muli-layered favicon and why should I add it to my site? Well to keep it simple, it’s the icon you see when you’re on a website (close to the address bar).
…to keep it simple, it’s the icon you see…on a website…
But more specifically, it’s a single icon file with layers of multiple sized images. You can use that one favicon and each browser will render the largest version of it.
It’s really great to have because it helps you in these ways:
- More professional appearance
- Bookmarks
- Pinterest shows it
- Branding
- Internet Explorer 9+ uses larger favicons
- Future proofs your favicon
For this tutorial, I’m going to show you how take a graphic from Photoshop and incorporate it as a multi resolution favicon for your website. As a bonus, I’ll also show you an easy way to add it to your Genesis powered WordPress site!
Now that we understand the WHAT and the WHY, let’s get to the HOW!
What You’ll Need
To make and add your own multi-layered favicon to your site, here’s what you’ll need:
- Photoshop or a similar image editor, like GIMP
- Website and FTP access
- Code editor with FTP client
- *Optional: WordPress and Genesis Framework
Alright, we have our supplies, time to get started with our multi-sized favicon!
Step 1 – Create Your PNG Icon
First, create a 256px icon in Photoshop (this part is up to you)
![]()
Quick Tip: I recommend using a graphical element from your logo for your favicon.
Then, save image as a 256px PNG file and name it favicon.png
![]()
Now that you’ve got your AWESOME icon, you can create your multi-layered favicon. It’s pretty easy, there’s an online tool that does all the work!
Step 2 – Convert PNG to Multi Resolution ICO
To begin, go to ConvertICO.org
Side Note: As pointed out in the comments, you could also use FaviconIt or Real Favicon Generator.net to generate you ICO files.
Next, click Choose File and select your favicon.png image
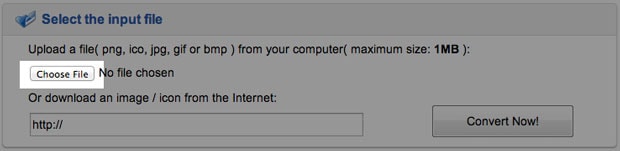
Then, choose Custom dimensions and Multi-size in one icon
![]()
From the options, select the sizes you want. I recommend the following dimensions:
- 16 x 16
- 32 x 32
- 64 x 64
- 128 x 128
- *256 x 256 (if you think you’ll need it)
Next, click the Convert Now! button
Finally, download your favicon.ico file

Side Note: If you like this tutorial, you may want to learn how to find the Pinterest Pin Count for ANY web page.
Step 3 – Add Multi-Layered Favicon to Your Site
Using your FTP client, upload your favicon.ico file to your site’s root. For example, our favicon is at http://www.craftsbycourtney.com/favicon.ico
The next series of steps differ slightly. The first is for a static site and the second is for WordPress site using the Genesis Framework.
So choose the one that’s right for you!
Add the Favicon to Your Static HTML Site
Now, open your favorite code editor to add the following code to the <head> of your webpage(s):
<link rel="Shortcut Icon" href="http://www.yourdomain.com/favicon.ico" type="image/x-icon" />
Next, save and upload your webpage(s)
Add the Favicon to Your Genesis Powered WordPress Theme
From your code editor, open up your child theme’s functions.php file and add the following code:
//* Display a custom favicon
add_filter( 'genesis_pre_load_favicon', 'sp_favicon_filter' );
function sp_favicon_filter( $favicon_url ) {
 return 'http://www.yourdomain.com/favicon.ico';
}
Then, save and upload your functions.php file
Step 4 – Clear Cache
Finally, clear your browser’s cache and refresh your browser. With a little luck, you’ll see something this…
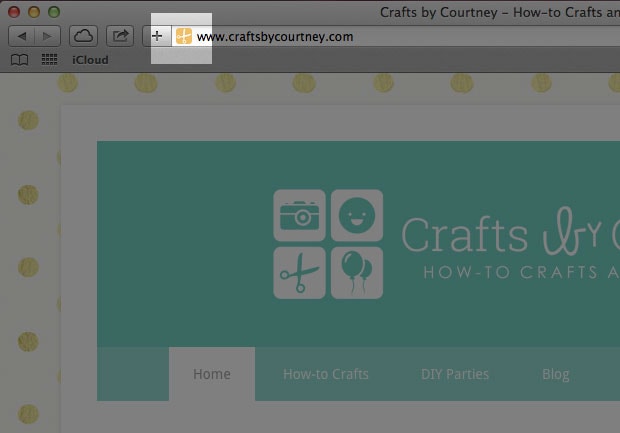
Side Note: It may take time to render the favicon (due to DNS caching). Allow up-to 3 days for DNS cache to clear.
So there you have it! A simple way to make and add your own custom multi-layered favicon.
I think it’s something any webmaster can do. BUT, If you need ANY help, please feel free to post a message in the comments.