I just couldn’t wait to finish editing these pictures and write the post up!
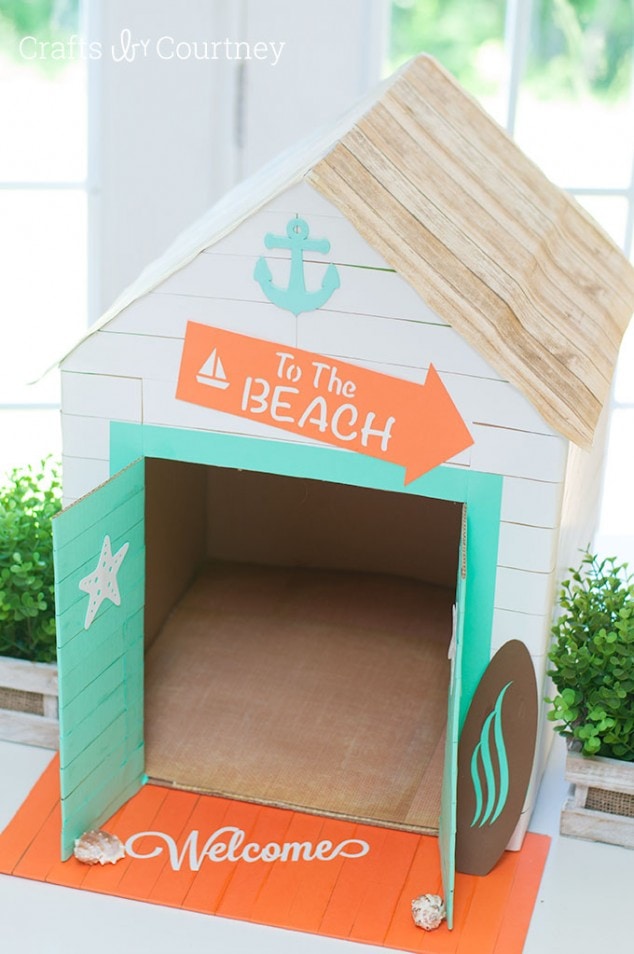
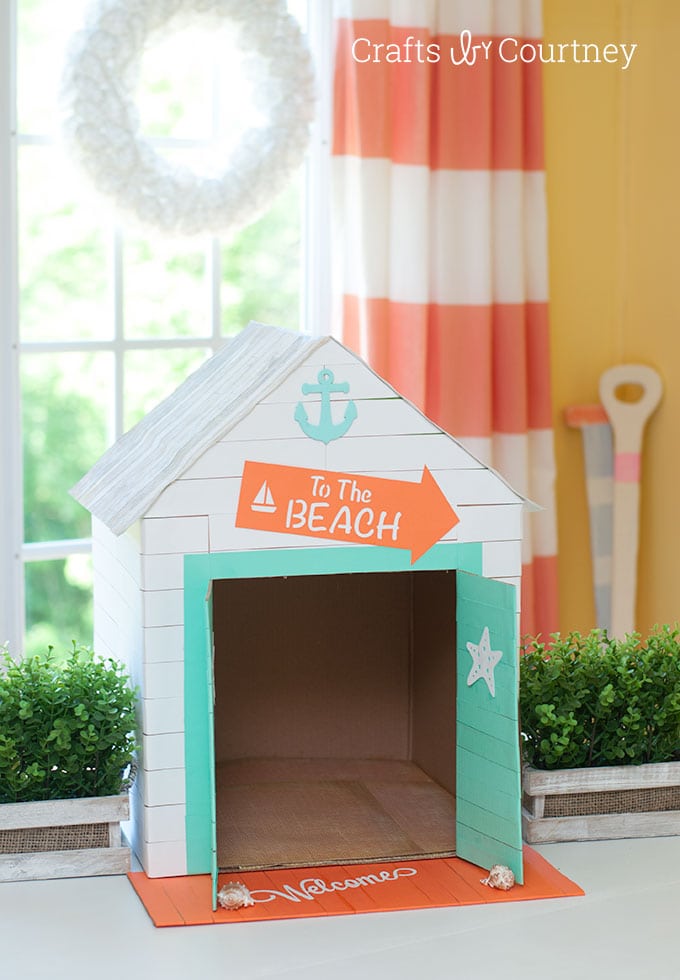
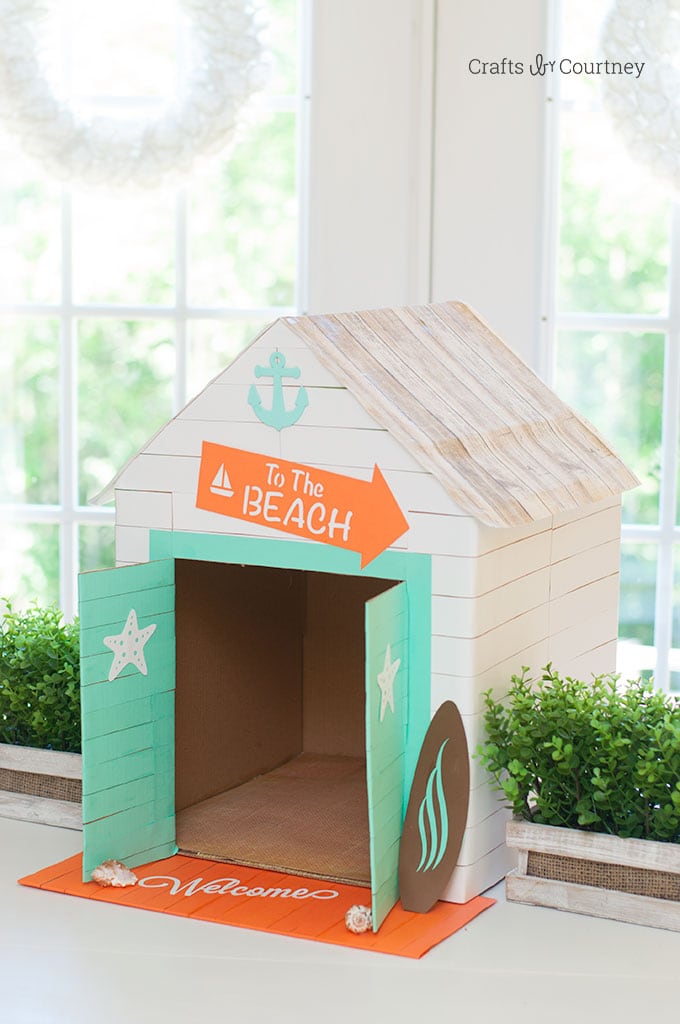
I just finished writing a book DIY Box Creations, so I have box crafts on the brain right now. I did a dollhouse and dog house for the book. So I kinda wanted to combine these two crafts and make a fun cat house for our little cats. BUT I wanted to give it a fun beachy vibe (of course). I totally think you get that vibe from this craft. If you don’t have a cat then this could be a doghouse!
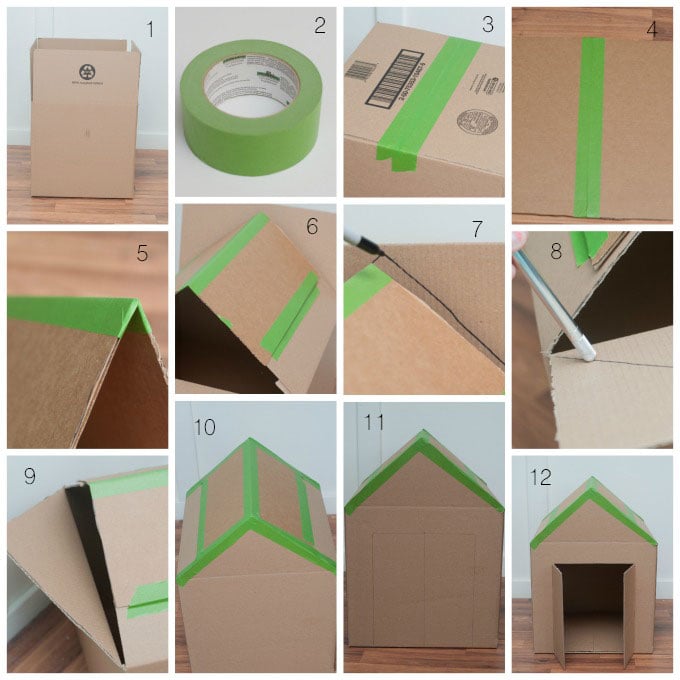
Step 1 – Make Your Box Shape
SO I’m just going to describe the shape quickly, if you have any questions just ask and I’ll answer any questions. Because really you can make any shape you decide.
I taped up the bottom of the box with painter tape, which works the best with these kinds of projects. Then I used extra pieces of cardboard to help create the top shape of my house. I added some painters tape to the middle (4 & 5) of the two extra pieces and was able to bend it to make to top part of the house. I taped those pieces in place (6).
Next I used a sharpie to help outline the point on the roof for the cat house. I used my “trusty” x-acto knife to cut it out (7, 8 & 9).
Then, I used my “handy dandy” painters tape to tape up the top of my box (10).
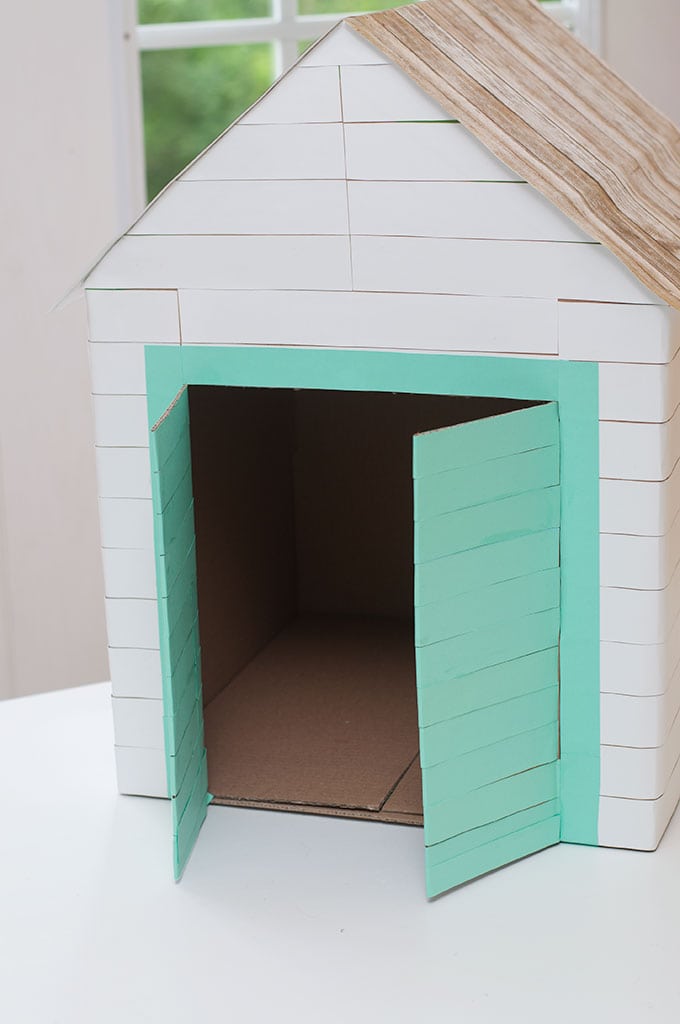
Finally, I decided to make my door, I thought a cute set of french doors would be perfect. I measured and cut the doors out with an x-acto knife.
I hope the pictures help with my description of making the house! I really didn’t want to have 15 steps for this craft, but I wanted everyone to get an idea on how to make it.
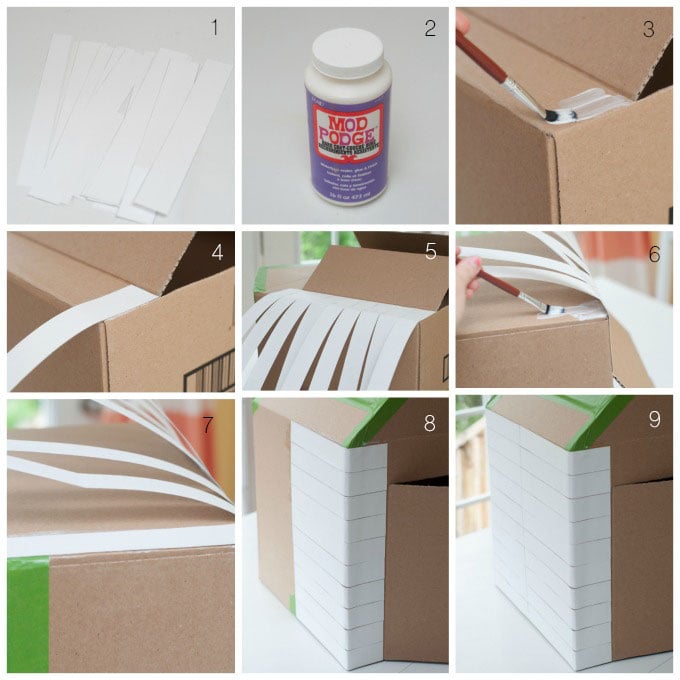
Step 2 – Add Plank Walls
Next I used my “handy dandy” Mod Podge to add the planks walls. I cut strips of white cardstock for my planks. I started at the front of the box and started working my way around. This part was super easy but little time consuming because I had to cut all the planks out.
But totally worth it, because I think it really gave that plank wall effect. I wish doing the walls in my own home would be this easy!
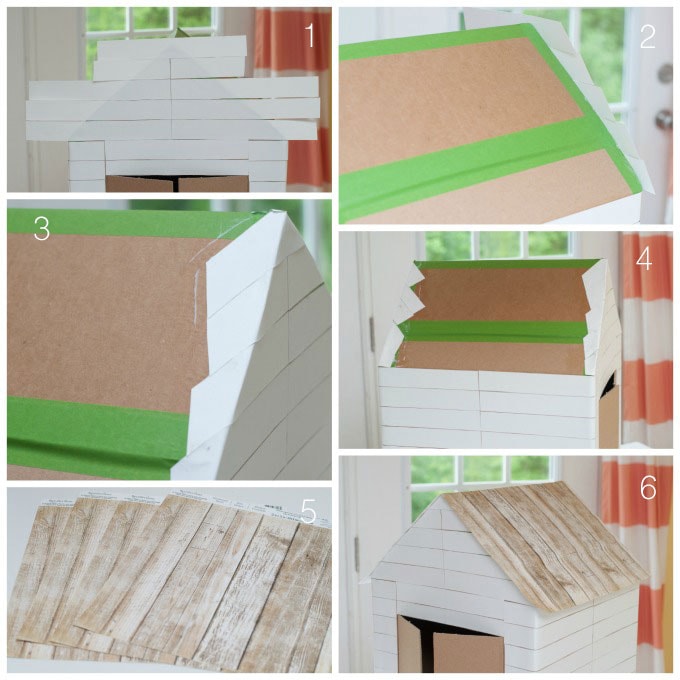
Step 3 – Add Front Planks and Roof
Now it’s time to finish the roof. I finished adding my planks to the front of the house. I cut off the excess paper and Mod Podged them down. For the actual roof it was really hard for me to decide exactly what I wanted to do. Should I do a plank roof, but at the time I didn’t have enough blue paper.
So I started looking through my scrapbook paper and found these pieces that looked like rustic pieces of wood. I’m really glad I decided to use the ‘faux” wood pieces of scrapbook paper (from Michael’s .59 cents each). Because I think a blue roof would have been too much. Same with all the other steps, I Mod Podged the roof down. It was super easy and took no time!
Step 4 – Add Plank Doors
Let get started on those plank doors! I really wanted them to match the rest of the house, but add a pop of color. Of course I had to use my favorite coastal color for the door. This time I made my plank strips a little smaller about as wide as a kids ruler. Since the strips were long enough I was about to wrap them around the door and Mod Podge any excess inside the cat house.
I thought a border around the door was a nice finishing touch! Don’t you agree?!?
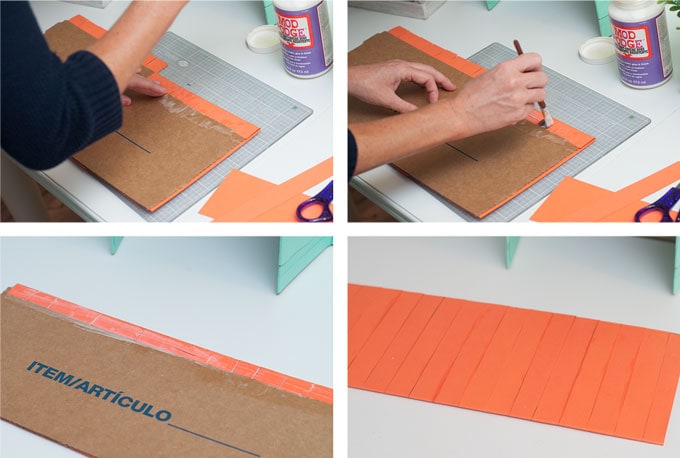
Step 5 – Make Front Walk
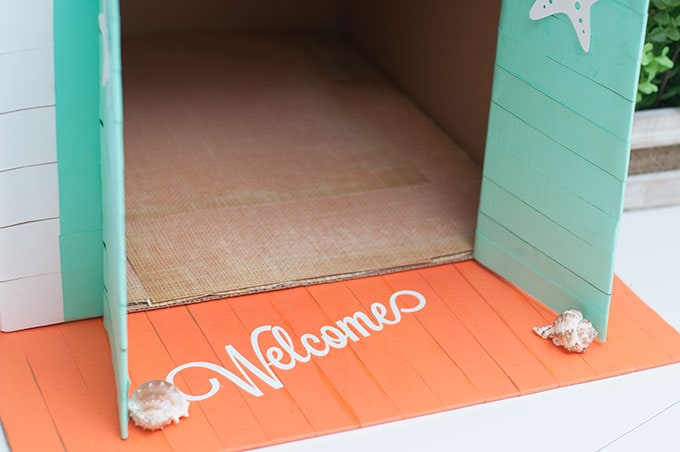
I really loved the french door look, BUT the doors wouldn’t stay open so I had to figure something out… and fast.
I ended up deciding to make a little front area for the cat house. I used an extra piece of cardboard and made my planks for that as well. I wanted to introduce another color as well, I didn’t have any coral color paper but I thought this came close.
Once I finished, I hot glued the piece to the bottom of the cat house. Then I hot glued some shells down to help keep the doors open so it would be easy for the cats to walk in and out.
Finishing Touches
Finally my favorite part was adding all the fun details. I used my Silhouette Cameo for that, like the “Welcome” “To the Beach”, Starfish and surfboards. It was so quick to go in, find what I needed and cut them out. Now it’s time to look at all the pictures!
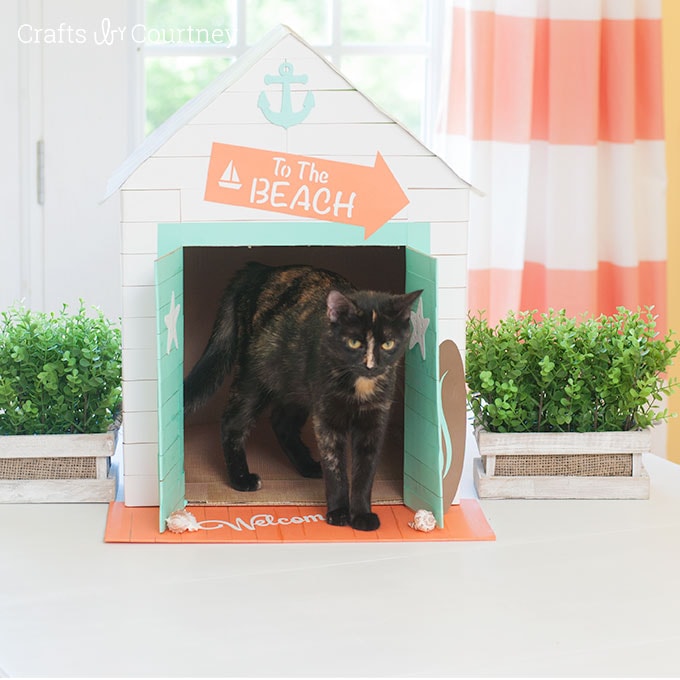
This kitty cat loves it! I’m totally not kidding, I’ll have to share pictures on Instagram, they are pretty cute! Ignore the cranky expression of her face.
This cat or dog house fits in perfectly with my home and the beachy style I’m going for! Plus it was a lot of fun to work on, I finished my book 2 months ago so it was cool working on a new cardboard box craft again.
Love, Courtney