Crafts by Courtney

How-to Crafts and DIY Parties

  • Home
  • How-to Crafts
    • Home Crafts
      • Holiday
      • Seasonal
      • DIY Decor
    • Kids Crafts
      • Holiday
      • Seasonal
      • Educational
      • Clean
      • Messy
  • DIY Parties
    • Birthdays
    • Just for Fun
    • Holidays
  • Blog
    • My Thoughts
    • Hubby’s Corner
  • About
  • Contact

DIY Easter Sign

Craft Materials

Before starting this project, you’ll need the following materials:

Hello friends, I’m sharing a last minute craft project using my Silhouette Cameo 4.  This DIY Easter Sign!

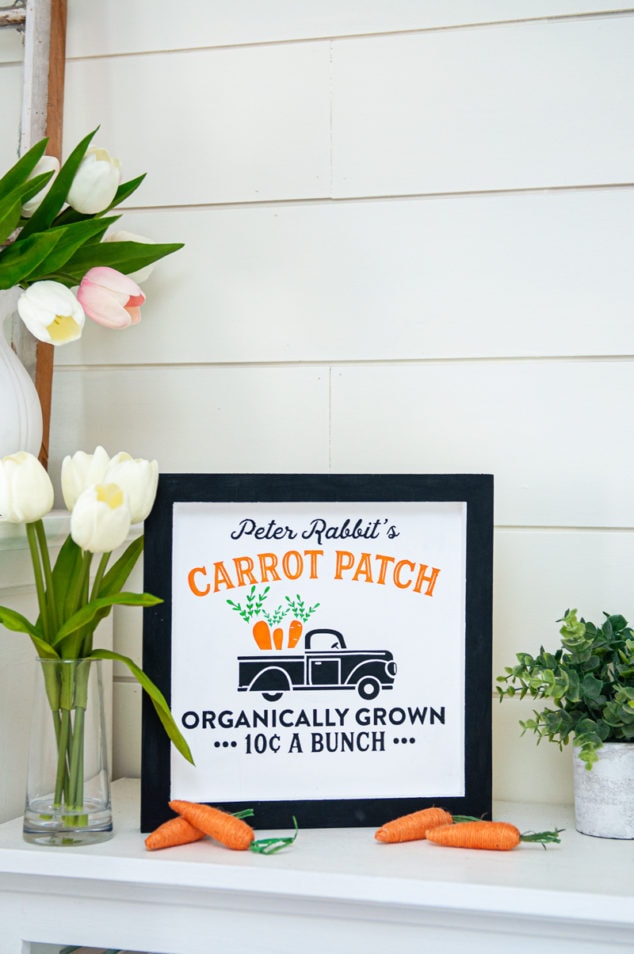
I LOVE making my own DIY signs.  I can customize the colors and look to fit my decor. With this Easter sign I wanted to go with a farmhouse feel.  Today, I’ll show you how easy it is to make your own custom Easter Sign!

So let’s grab our supplies and get started!

DIY Easter Sign Supplies Needed:

  • Wood Wall Panel 12×12
  • Acrylic Paint
  • Vinyl Sheet
  • Transfer Paper
  • Paint Brush
  • Silhouette or Cricut Cutting Machine

Step 1 – Paint Wooden Panel

First things first… Let’s paint our wooden panel.  I painted the whole thing white first, then painted in the sides with black paint.

Only three coats of white paint was needed and one coat of black.  Let each coat dry 5 minutes.

Step 2 – Cut Your Stencil

Next find and cut your design. I found my design in the Silhouette library.  Measure your design to fit your wooden panel.

Once you have cut and weeded your stencil, you will need to add transfer tape on top.  This will help transfer your stencil over to the wood panel.  After you added your transfer tape, pull off the back of your vinyl.

Step 3 – Transfer Stencil

Now center your stencil onto the wood panel.  Use your scraping tool to adhere the vinyl onto the sign.

Smooth out any bubbles, to prevent any paint from bleeding.

Now remove your transfer tape.

Step 4 – Paint in Stencil

Since we have the perfect stencil now, it’s time to add our paint!

I filled in the stencil with my paint.  Only two coats were needed for this step.

Step 5 – Remove Stencil

Once the paint has dried you can gently pull up your stencil to reveal your Easter Sign!

Finishing Touches

Now it’s time to display! I can’t wait to start decorating the house for Easter.

I wanted a farmhouse feel with this Easter sign and I think I accomplished that!  Add a few spring flowers to complete the look.

If you have any questions or need more detail on this project please don’t hesitate to ask! As always, thanks for stopping by and checking out my latest project.

Looking for another simple DIY Easter project?  Check out my Floral Easter Bunny on Stand I made last week!

More Easter Crafts

  • Easter Place Cards
  • DIY Decorative Egg Cartons 
  • Mod Podge Easter Eggs
  • Thread Spool Carrots

Courtney's signature

About Courtney Sanchez

Hi, I'm Courtney and I LOVE crafting! I am a mommy to 3 awesome boys (who keep me very busy) and wife to a loving husband. Crafts by Courtney is where I like to hang out ;)

Leave a Reply

Hi, I'm Courtney!

Welcome. Here is where I share the fun how-to crafts I've done with my kids and for my home. I also really love DIY parties too! Read More…

My Socials

  • Facebook
  • Instagram
  • Pinterest

Newsletter

Subscribe to my email newsletter for more craft ideas, tips and valuable resources.

The TOP 4

  • 33 Awesome Birthday Party Ideas for Boys33 Awesome Birthday Party Ideas for Boys
  • Terra Cotta Pot DIY Lighthouse Garden ProjectTerra Cotta Pot DIY Lighthouse Garden Project
  • Cardboard Box Craft - DIY DollhouseCardboard Box Craft – DIY Dollhouse
  • Painted Stick Nature CraftPainted Stick Nature Craft

Looking for more?

Over on Instagram

craftsbycourt

Happy Thursday friends! One of my favorite decor a Happy Thursday friends! One of my favorite decor accessories is... you guessed it, FOWERS! I have flowers all over my house, several in each room actually. I even switch them out for the seasons. One of my favorite places to find faux flower arrangements is @homegoods. They have the bet selection to choose from. 🌺🌻
.
.
.
.
#bedroommakeover #bedroominspo #blueandwhitedecor #coastalfarmhouse #coastalfarmhousestyle #farmhouseliving #farmhouse #whitebedroom #bedroominspiration #mybedroomstyle #bedroomstyling #ashleyfurniture #worldmarketfinds #coastalvibes #mystylishspace #bedroomlove #stylishhome #blueandwhiteforever #coastalinteriors #flowersofinstagram #flowerinspiration #flowerdecor #flowerstyling #
One of my favorite pieces in my master bedroom is One of my favorite pieces in my master bedroom is this light fixture I got at @worldmarket. I have been eyeing it for years, and knew when I finally decided to give my bedroom a makeover I had to have it! What a difference a light fixture can make in a room. I love just laying in bed and staring at it, kinda obsessed.
.
.
.
#lightfixture #lightfixturelove #lightfixturesofinstagram #lightfixtureobsession
#bedroommakeover #bedroominspo #blueandwhitedecor #coastalfarmhouse #coastalfarmhousestyle #farmhouseliving #farmhouse #whitebedroom #bedroominspiration #mybedroomstyle #bedroomstyling #ashleyfurniture #worldmarketfinds #coastalvibes #mystylishspace #bedroomlove #stylishhome #blueandwhiteforever #coastalinteriors
.
.
After being in our house for 7 years we finally de After being in our house for 7 years we finally decided in August to start our bedroom makeover. We've put this room off last and focused more on the other rooms in the house since we moved in. For our 20 year wedding anniversary, we decided it was time to give OUR bedroom a makeover now. I feel like it's been a long process, but I'm so happy with what's been done so far. It's so bright and airy in here now, a perfect way to relax and unwind for the day. We still need to shiplap the walls, but I wanted to share a sneak peek.
.
.
.
.
#bedroommakeover #bedroominspo #blueandwhitedecor #coastalfarmhouse #coastalfarmhousestyle #farmhouseliving #farmhouse #whitebedroom #bedroominspiration #mybedroomstyle #bedroomstyling #ashleyfurniture #worldmarketfinds #coastalvibes #mystylishspace #bedroomlove #stylishhome #blueandwhiteforever #coastalinteriors
Miss Scarlett sweet face! 😍🐾 . . . . #master Miss Scarlett sweet face! 😍🐾
.
.
.
.
#masterbedroom #masterbedroomdecor @our_coastal_farmhouse #coastalliving #coastaldecor #coastaldecor #coastalfarmhouse #goldenretriever #goldensofinstagram #goldensofinsta #dogsofinstagram #goldensretrieverofinstagram
BIG smile from Scout this morning! Happy Monday fr BIG smile from Scout this morning! Happy Monday friends! I've been working on a master bedroom refresh since August and I'm getting so close to finishing and sharing with everyone! I just need to shiplap those walls, but finding decor is so much easier and fun!
.
.
.
.
#masterbedroom #masterbedroomdecor @our_coastal_farmhouse #coastalliving #coastaldecor #coastaldecor #coastalfarmhouse #goldenretriever #goldensofinstagram #goldensofinsta #dogsofinstagram #goldensretrieverofinstagram
It’s Sunday! I’m so excited for this beautiful It’s Sunday! I’m so excited for this beautiful day. I'm sharing a project I did a couple years ago, a Terra Cotta Pot Lighthouse for my front flower bed🌸🌼. I used @decoart Outdoor Living Paints and It's been 4 years and this Lighthouse has held up great! 🎨Full Tutorial Link Below 👇👇
.
.
.
.
.
#decoart #decoartprojects #outdoorlivingpaint #garden #lighthouse #makersgonnamake #crafty #diy #diygarden #handmade #maker #garden_styles #outside_project #yardprojects #summerproject #outdoordecor
Follow on Instagram

Who I Work With

Crafts by Courtney   ·   Copyright © 2013 - 2022