Crafts by Courtney

How-to Crafts and DIY Parties

  • Home
  • How-to Crafts
    • Home Crafts
      • Holiday
      • Seasonal
      • DIY Decor
    • Kids Crafts
      • Holiday
      • Seasonal
      • Educational
      • Clean
      • Messy
  • DIY Parties
    • Birthdays
    • Just for Fun
    • Holidays
  • Blog
    • My Thoughts
    • Hubby’s Corner
  • About
  • Contact

Build a Beachy Pallet and Starfish Wall Craft

DIY starfish and pallet wall art

Beach season is here. Well I guess it’s always beach season here in Florida. I’ve lived in Florida since I was a little girl and have never decorated with beach decor. I thought it’s time!!!

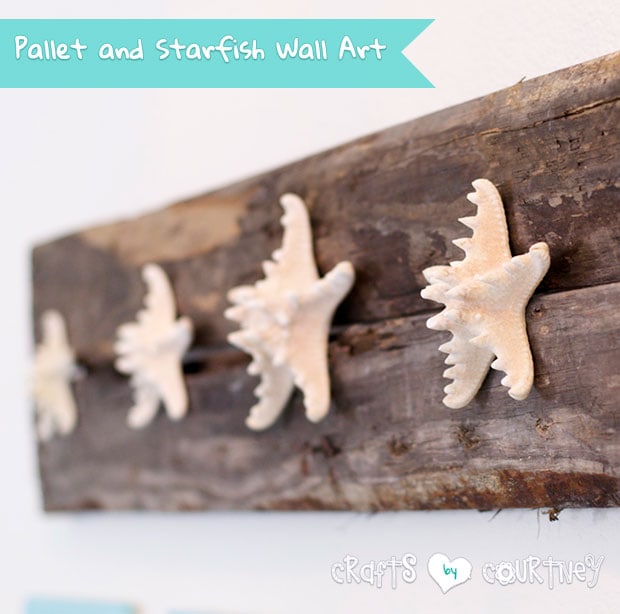
My first project was this starfish wall art I created out of an old pallet I had laying around. This was one of those super simple projects that I came up with out of no where.

I wasn’t planning on making this. I wanted to use these pallets for a sign in my kitchen, but one thing lead to another and voilà beach wall art was created!

Getting Started

My sweet and amazing husband surprised me with some pallets out in our garage. Who needs flowers when you get a pile of pallets to craft with!

I live in Florida so I pretty much have an unlimited supply of shells right? Well, I got these shells at Michael’s.

I just didn’t have time to drive down to the beach and pick up shells. Michael’s was the next best option. Plus Michael’s has EVERYTHING.

Pallet and Starfish Wall Decoration: Getting Started

Step 1 – Break the Pallets Apart

I really don’t have any great advice on breaking the pallets apart. I just got a hammer and went to it.

I’ve seen on other sites where people have gotten special tools to take them apart. My tip is…a little patience and a good hammer does the trick. Just be prepared to have your eardrums busted. It gets so loud, yikes!

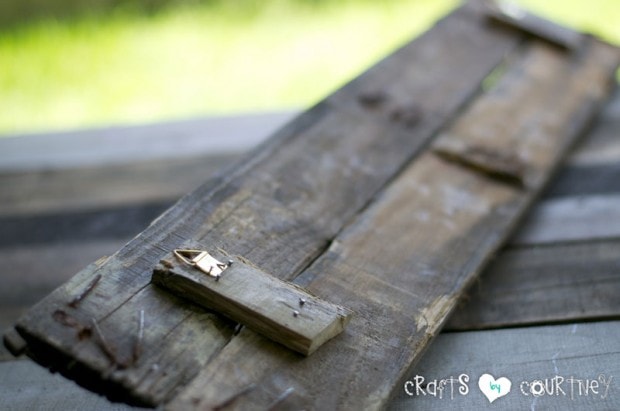
Step 2 – Put Your Pallet Back Together Again

I used an extra piece of the pallet and cut it in two pieces to fit the back of the pallet. I laid them on the back part of my pallets and used some small nails to hammer them in place.

Being careful will make sure my pallets are securely together. I don’t want these falling apart on me once I hang them on the wall.

Pallet and Starfish Wall Decoration: Put Your Pallet Back Together Again

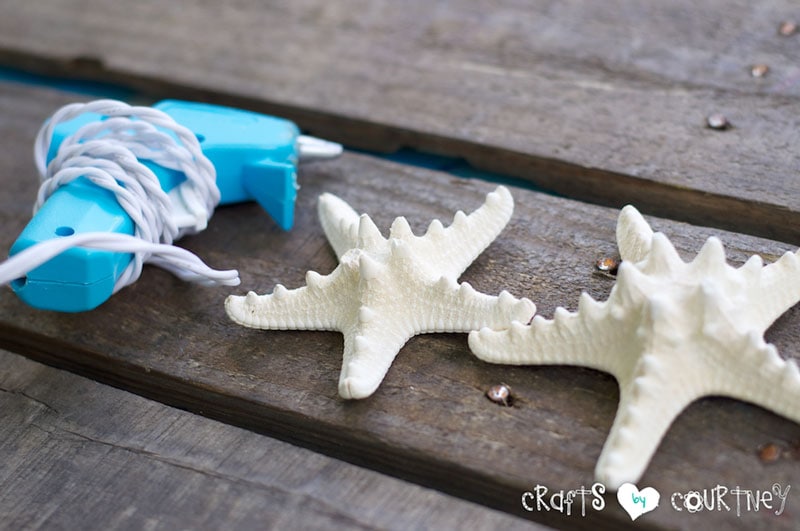
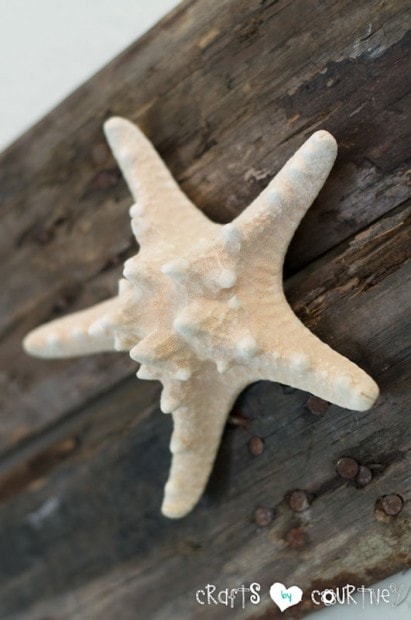
Step 3 – Add Your Starfish

Like I said, I found these bags of starfish at Michaels. But honestly, I’ve seen bags of shells everywhere (especially at TJ Maxx and Marshall’s).

Once I decided the order I wanted my shells, I just added a little hot glue on the backs. Enough to make sure they will stay in place, but not too much if I ever decide to take them off.

Pallet and Starfish Wall Decoration: Add Your Starfish

Step 4 – Finishing Touches

I nailed some frame hardware hooks to the back of my pallets and it was ready to hang on the wall. With a little help from the hubby, my project was hung and done in no time.

Pallet and Starfish Wall Craft: Finishing Touches

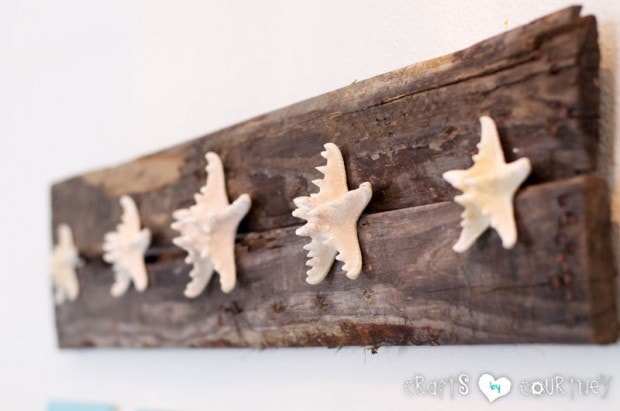
I think my summer pallet craft turned out great! I just love the rustic look of the pallets. I really feel they look like old drift wood.

If you liked this beach craft, I really think you’ll LOVE these seashell picture frames.

Come check out my entire beach décor for the house!!

Love, Courtney

About Courtney Sanchez

Hi, I'm Courtney and I LOVE crafting! I am a mommy to 3 awesome boys (who keep me very busy) and wife to a loving husband. Crafts by Courtney is where I like to hang out ;)

Leave a Reply

Courtney Sanchez

Hi, I'm Courtney!

Welcome. Here is where I share the fun how-to crafts I've done with my kids and for my home. I also really love DIY parties too! Read More…

My Socials

  • Facebook
  • Instagram
  • Pinterest

Newsletter

Subscribe to my email newsletter for more craft ideas, tips and valuable resources.

The TOP 4

  • Terra Cotta Pot DIY Lighthouse Garden ProjectTerra Cotta Pot DIY Lighthouse Garden Project
  • 33 Awesome Birthday Party Ideas for Boys33 Awesome Birthday Party Ideas for Boys
  • DIY Robot Costume with Duck Tape®DIY Robot Costume with Duck Tape®
  • Painted Stick Nature CraftPainted Stick Nature Craft

Looking for more?

Over on Instagram

craftsbycourt

Another fun day at the greenhouse transplanting Ri Another fun day at the greenhouse transplanting Rivieria Midnight Blue.  These flowers are so beautiful full grown. ✨I have to say I’ve really enjoyed working at my local green house these past couple weeks.  Seeing all the amazing flowers, transplanting them and getting my hands dirty.  I just love it!! 🌿It was such a beautiful day here in NC, just makes you appreciate the warm weather so much.  Ready for Summer 🌻🌞
Salon days with Hannah are my fav days 🤍Cut a Salon days with Hannah are my fav days 🤍Cut and color by @beauty_itwith_grace
Spring is here!! Well kinda... It's been cold and Spring is here!! Well kinda... It's been cold and rainy here in NC. But tomorrow it's should be warmer weather and the sun out! I'm excited about that!Sharing a Spring project I made on the blog a couple years ago using @decoart acrylic paints!Head over to the blog for full tutorial, link below 👇
Sharing a lighthouse project I did several years a Sharing a lighthouse project I did several years ago on the blog!! Actually it's one of my favorite projects.Link to full tutorial below 👇#craftblog #craftsbycourtney #creativehappylife #homeblogger #craftblogger #diy #diyaddict #farmhousedecor #crafting #crafter #tutorials #homedecor #summerwreath #farmhousestyle #dollartreeaddict #dollartreecrafts #summercrafts #coastalliving #coastaldecor #coastalcraft #coastaldecor #coastalstyle #lighthouse #lighthousecraft #foamcraft #nautical #nauticalcrafts
Happy first day of Spring!! 🌺🌸🌼🌻🌷 Happy first day of Spring!! 🌺🌸🌼🌻🌷Ready for warmer weather here in North Carolina!
Had to stop by a cute little beach by my old house Had to stop by a cute little beach by my old house in Apollo Beach in Florida.  It’s crazy how I took all these little beaches by my house for granted when I lived there.  I’d be at them everyday now if I could. 🌊😩🐚✨😉
Follow on Instagram

Who I Work With

Crafts by Courtney   ·   Copyright © 2013 - 2023